
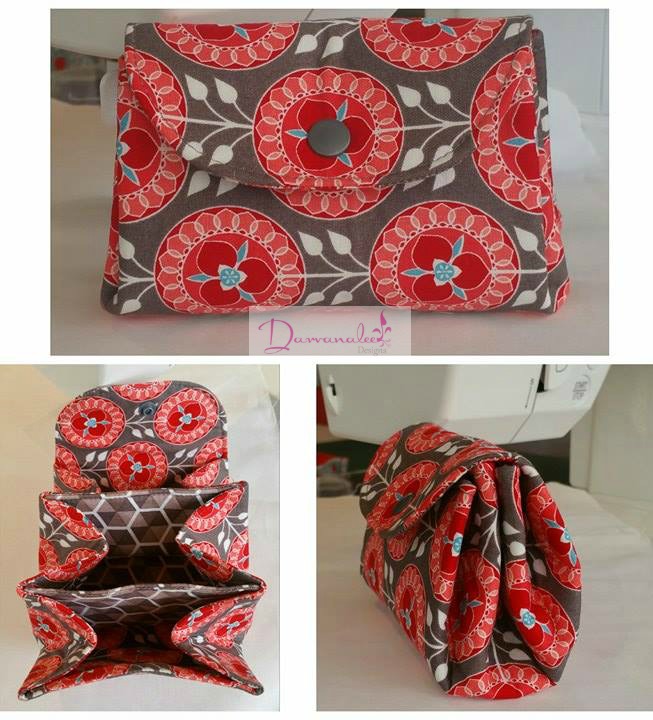
Accordion Pouch Hacks
This pattern was initially by shabby fabric,
I just show you here some of the hacks that I have done to give me,
in my believe a Quicker and Better finish to the Pouch.
So let's get started!
You Can Find Everything You Need for this Project
Here
This pattern was initially by shabby fabric,
I just show you here some of the hacks that I have done to give me,
in my believe a Quicker and Better finish to the Pouch.
So let's get started!
You Can Find Everything You Need for this Project
Here
What you will need:
2 or 3 Fat Quarters
2 - 5” by 8” rectangles of your choice (can be cut from FQ’s)
Fusible Fleece
Medium or Heavy weight interfacing
Shabby Fabrics Pattern template HERE
1. Once you have selected what you are going to have as your lining and our outer fabrics take your pattern template that was supplied by Shabby Fabrics, you can Find that HERE.
Cut on the Fold 1 piece for your outer and 1 piece for your lining set aside
Now cut two 5”x 8” rectangles these can be cut out from your fat quarters or different fabrics to make it a scrappy as you like.
2. Now take your Fusible Fleece and your Interfacing and cut one of each Fleece and Interfacing using your pattern template
Next, we need to cut one each of interfacing and Fleece for the
5”x 8” rectangles
3. Fuse them to the corresponding fabrics making sure that the outer fabric has the
fusible fleece on it and the lining has medium to heavy interfacing.
I show you this in our Vidoe below
4. Now, Take you lining pieces of both the pocket and purse.
First, take your Interfaced Rectangle and fold in half with the right
facing, short side to short side.
Make a mark on the Fold line. Once, you have made this
mark, then cut a small slit around 1" to 1.5" and set aside.
Next, take the Interfaced Lining piece for the purse.
Next, with right side facing down and the interfacing facing up. Fold,
the bottom edge up to just under the Flap of your purse,
make a create and draw a line around 2" long.
Then Cut along that line to make a slit.
See Video HERE for a clearer demonstration
5. Now, it's time to sew.
Take your outer and lining pieces and place them with
Right sides together and sew a ¼” all the way around
Set aside and repeat with the rectangles pieces.
6. Next, you will take your Pinking shears
and reduce your seam down to around a 1/8", this reduces the bulk.
Trim the corners of your rectangle piece and then,
Gently turn your pieces right side out.
Making sure give a good press.
7. Top stitch both your pieces.
I find using a longer stitch length approx 2.8 to 3.0 is really good for topstitching and gives your work a nice finish.
8. Now take your rectangle piece Fold in half short end to short end.
Make a mark in the centre crease and then make a mark
1/2" up and 1/2" down and
create a rectangle box.
Now, line your rectangle up with at the bottom of the flap on your purse.
With the lining fabric of both the purse and your rectangle touching making sure that the cut sections are either touching or just touching. Pin in Place. You can see this is clearly the video.
With the lining fabric of both the purse and your rectangle touching making sure that the cut sections are either touching or just touching. Pin in Place. You can see this is clearly the video.
9. Now sew on that line to secure the rectangle piece.
Making sure that your bobbin thread matches our outer fabric.
As you are sewing through bulk here, you want to lengthen your
stitch length to a 2.8 to 3.0 so you get a better finish of stitching.
10. Lay your piece flat. Take your pattern template, that has been
supplied by Shabby Fabrics and lay it one Top.
Using the marks on the pattern template mark your purse piece.
The take each side of the rectangle and match up your marks.
11. Once this is in place pin. Now is the time to play with the sitting of your purse.
Once you are happy with how it is sitting. glue it with the glue and clip it clip with wonder clips and leave it for 24 hrs.
12. Now we are adding the clasp.
Find the centre of the purse flap and mark where you would like the clasp to sit.
Now make a small hole with your quick unpick and place the stem of the snap into the hole and take the make part of the snap and place over and clamp with the tool.
Repeat for the remaining clasp but making sure that your flat part of the clasp is on the inside of your purse.
Your Purse is now complete “)
Happy Quilting and Crafting ") N
Happy Quilting and Crafting ") N


